LJ Sedgwick

Content Writer for Coaches and Course Creators

  • About
  • Work With Me
  • Portfolio
  • Contact
  • Blog

January 17, 2019 by LJ Sedgwick 2 Comments

Create Easy Colour Schemes From Photos Using Indesign

Getting your colour scheme right can make or break your project. Whether you’re picking your new brand colours or creating new business cards, you want a way to create easy colour schemes.

You might turn to websites like ColourLovers or Paletton for inspiration. Why not? They’re both very good options. I used Paletton to come up with my own brand colour scheme.

Consistent colours are a great way to build a visual brand. Learn how to create easy colour schemes from photos using InDesign in this tutorial.
Pin this!

But there’s a tool in InDesign that can also help you find a more custom solution. By sampling colours from a photo, you won’t be using the same colour schemes as everyone else. And InDesign automatically chooses the shades that work well together.

So let’s fire up InDesign and get started.

How to Use InDesign to Create Easy Colour Schemes

You’ll need an image to start with. You could always choose a photo of your company HQ or something that sums up your brand.

I’m using this image I took in December 2018 of light trails along Newcastle’s Quayside.

The source image for creating easy colour schemes.
The image I’m using – from my Flickr account!

Create a new document in InDesign. Head to File > Place and drop the image into the document.

Browse to the toolbox and choose the Colour Theme Tool. It looks like the eyedropper. In fact, click and hold on this tool and you’ll be able to access the regular Eyedropper Tool.

The Colour Theme Tool, used for creating easy colour schemes.
The Colour Theme Tool

With this tool, simply click on the photo to sample the colours. InDesign will do the rest.

The options available for creating easy colour schemes.
Choose from five different colour palettes

InDesign automatically selects colours from your image to create suggested palettes. Click on the arrow to see four more alternative palettes, depending on the look you’re ultimately going for.

Adding swatches is also simple for creating easy colour schemes.
Add to Swatches

Click on the Add to Swatches icon to the right of the suggested colour palettes to ‘save’ the chosen palette.

The new swatches, perfect for creating easy colour schemes.
Your new swatches

InDesign adds the new swatches within a folder so you can easily find them. It also gives the CMYK or RGB values of each colour, depending on your document’s colour mode.

This is what my chosen theme would look like as colour blocks.

The results of the tutorial!
My colours!

Now you can go ahead and use your colours in a document. Remember, InDesign only saves palettes into the working document. You’ll have to save the swatches and load them into other documents if you need to work across documents with the same colours.

Here’s one I made earlier!

And here’s a quick example of a document created using just those colours.

The results of the tutorial!
Example

You could also export the swatches for use in Illustrator and Photoshop.

So there you have it! A simple way to make easy colour schemes using photographs in InDesign. The world is your colourful oyster!

And if you liked this tutorial, you might also enjoy this swift walkthrough for boosting colours in Affinity Pro.


Want to learn how to write good blog posts quickly?

Sign up below and I’ll send you my cheeky checklist and guide. I’ll also send you other blogging resources from time to time.

* indicates required

Please select all the ways you would like to hear from LJ Sedgwick:

You can unsubscribe at any time by clicking the link in the footer of our emails. For information about our privacy practices, please visit our website.

We use Mailchimp as our marketing platform. By clicking below to subscribe, you acknowledge that your information will be transferred to Mailchimp for processing. Learn more about Mailchimp’s privacy practices here.

Filed Under: Software Tutorials Tagged With: indesign, software, tutorial

August 24, 2017 by LJ Sedgwick 1 Comment

How to apply a digital watermark to your images in Photoshop

You’ve probably seen images online with watermarks on them. Some of them are very blatant, some are far more unobtrusive. In this tutorial, I’m going to show you how to add a subtle digital watermark in Photoshop.

Ever seen images with a subtle digital watermark online and wondered how they were made? This guide shows you how to make your own in Photoshop!

I’m using my own image from the website for my fiction pen name – you can easily use your own!

Ever seen images with a subtle digital watermark online and wondered how they were made? This guide shows you how to make your own in Photoshop!
My digital watermark

All you need is Photoshop – and some images.

Ever seen images with a subtle digital watermark online and wondered how they were made? This guide shows you how to make your own in Photoshop!

Let’s get started on your digital watermark!

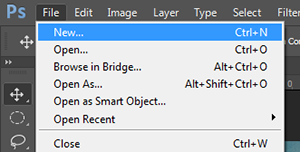
Go ahead and open Photoshop. Head to File and then New.

Ever seen images with a subtle digital watermark online and wondered how they were made? This guide shows you how to make your own in Photoshop!
Step 1

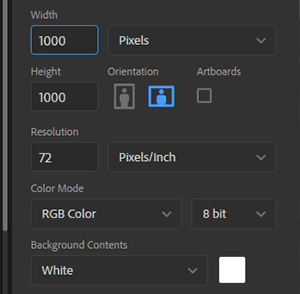
Now we’re going to make a new image. The size doesn’t really matter because we’re going to be making a brush from the result. But make it at least 1000px wide.

Ever seen images with a subtle digital watermark online and wondered how they were made? This guide shows you how to make your own in Photoshop!
Step 2

Now get the Type tool. I’m using the copyright symbol (©) and my photographer/fiction writing pen name.

So I pressed Alt and 0169 on my numeric keypad to make the copyright symbol. Then I just typed my name in my brand font. In my case, it’s UglyQua.

Ever seen images with a subtle digital watermark online and wondered how they were made? This guide shows you how to make your own in Photoshop!
Step 3

Now we’re going to turn this into a brush. That’s going to let you just stamp your text onto each image as required. It’ll save you typing it over and over! And this is the start of your digital watermark.

Now go to Edit in the top menu bar and choose ‘Define Brush Preset’.

Ever seen images with a subtle digital watermark online and wondered how they were made? This guide shows you how to make your own in Photoshop!
Step 5

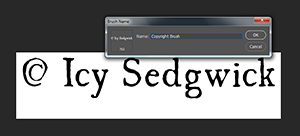
You’ll get a little preview of what it’ll look like. Because it’s black on white, your brush will have a transparent back.

Give it a name if you want, and hit OK.

Now we’ll apply your watermark.

So now go ahead and open the image you want to add a digital watermark to.

Ever seen images with a subtle digital watermark online and wondered how they were made? This guide shows you how to make your own in Photoshop!
Step 6

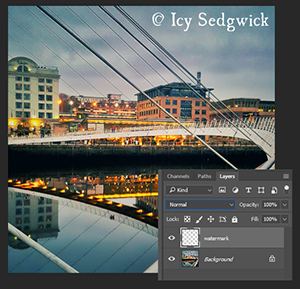
I’m using an image I took of the Millennium Bridge in Newcastle upon Tyne.

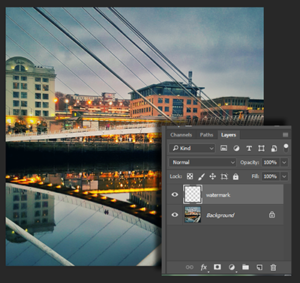
Create a new layer and rename it ‘Watermark’. The new layer icon is the second from the right at the bottom of the Layers panel. You need that new layer so you can blend the digital watermark with the image below.

Ever seen images with a subtle digital watermark online and wondered how they were made? This guide shows you how to make your own in Photoshop!
Step 7

Now access the paintbrush icon in the toolbox on the left. Find your brush in the brush preset picker in the top menu bar. If your brush was the last thing you made, it’ll show up straight away.

Ever seen images with a subtle digital watermark online and wondered how they were made? This guide shows you how to make your own in Photoshop!
Step 8

Check the brush settings are at ‘Normal’ and 100% opacity. I’ve chosen white but this also works with black (depending on the background of your image).

Just use the brush like a stamp and click once on your image wherever you want the digital watermark to appear. Use the [ and ] keys to make the brush larger or smaller.

Use the Move Tool if you want to move it around once you’ve made the watermark.

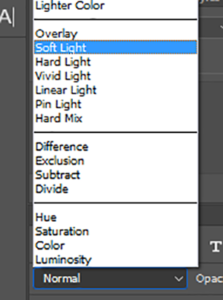
Once you’re happy, find the bar saying ‘Normal’ in the Layers panel. Click on it and choose ‘Soft Light’ from the blending mode option.

Ever seen images with a subtle digital watermark online and wondered how they were made? This guide shows you how to make your own in Photoshop!
Step 9

This will blend your digital watermark with the image below. It makes it less obtrusive.

Ever seen images with a subtle digital watermark online and wondered how they were made? This guide shows you how to make your own in Photoshop!
Step 10

And here’s your final image! You can alter the opacity in the opacity bar to make it less transparent if you want a more subtle effect. Just drag the slider to the left, or type in a new value.

So there’s your digital watermark, ready to use!

Let me know if there’s something else you’d like to know in Photoshop. Or you can find out how to boost your colours in Photoshop too.

Filed Under: Software Tutorials Tagged With: brushes, digital watermark, photography, photoshop, tutorial

Find me online!

 facebook-48google-plus-48
instagram-48 twitter-48 pinterest-filled-50

Icons by Icon8.

Who am I?

I help tech startups connect with new audiences by writing in-depth blog content!

Find…

Coded Creative

Coded Creative

Recommended Wordpress Themes

Beautiful Dawn Designs - Feminine WordPress Themes

Links

About
Work With Me
Portfolio
Contact
Privacy Policy

Email me!

hello@ljsedgwick.xyz

Find Me Online

Who am I?

I help coaches and course creators connect with new audiences by writing in-depth blog posts and course content!

Copyright © 2025 · Hello Pro on Genesis Framework · WordPress · Log in